In this series of blogs I want to show how we access the Azure REST API directly using Postman in order to understand how applications can get authenticated and authorized automatically without having the user enter a username and password.
Overview
The Azure REST API is the under pinning’s for all the other client access tools. The Azure portal, PowerShell Cmdlets, Azure CLI and language SDK’s all ultimately talk to the REST API. You can view the API reference documentation here.
In order to show some details I could use any of the tools available however; for these blogs I will be using the Azure RM PowerShell Cmdlets. Details on how to install them can be found here.
Once you have them installed, go ahead and login using the cmdlet Login-AzureRmAccount
without any parameters. This will bring up a UI where you supply your credentials and will setup you access context for future cmdlets.
Request URI Format
The URI for an Azure REST request starts with the following:
https://management.azure.com/subscriptions/{subscriptionId}
You can determine what subscriptionId to use as follows:
Get-AzureRMSubscription | Select Name, Id, State

Here I have three subscriptions, one disabled because I spent all my money this month.
The next part of the URI is as follows:
https://management.azure.com/subscriptions/{subscriptionId}/resourceGroups/{resourceGroupName}
Azure is managed using the Azure Resource Manager and therefore all resources are created in the context of a Resource Group and needs to exist before the API can be used. You can create a resource group using the REST API of course once I show you how.
You can determine what resourceGroupName to use as follows:
Set-AzureRmContext -Subscription “0e6bd247-2151-4ac7-a5ff-********”
Get-AzureRmResourceGroup | Select ResourceGroupName, Location

Since I have three subscriptions, I set my context to the one I am interested in and get a list of all the resource groups under that subscription.
The next part of the URI is as follows:
https://management.azure.com/subscriptions/{subscriptionId}/resourceGroups/{resourceGroupName}/providers/{provider}
A provider is a service that supplies the resources you can deploy and manage through Resource Manager. Each resource provider offers operations for working with the resources that are deployed. We can use the Get-AzureRmResourceProvider cmdlet to list all the providers for our subscription. The list is long so I will filter on the Azure SQL Database provider.
Get-AzureRmResourceProvider -ListAvailable | where {$_.ProviderNamespace -eq ‘Microsoft.SQL’}

Notice we have a property called Locations. This determines what location/region this provider is available in however; your subscription also has to be available in the same region to use it. We can expand Locations to get the list.
Get-AzureRmResourceProvider -ListAvailable | where {$_.ProviderNamespace -eq ‘Microsoft.SQL’} | Select -expand Locations

The next part of the URI is as follows:
https://management.azure.com/subscriptions/{subscriptionId}/resourceGroups/{resourceGroupName}/providers/{provider}/{ResourceType}
Each provider can do multiple things. For example; the Microsoft.SQL provider can create a database using the Servers/Databases resource type. This is where the URI will be different for different API call. The cmdlet below expands that property out and again it also shows the locations the resource type can be used in.
$res = Get-AzureRmResourceProvider -ListAvailable | where {$_.ProviderNamespace -eq ‘Microsoft.SQL’} | Select -expand ResourceTypes
$res | where {$_.ResourceTypeName -eq ‘Servers/Databases’}

The last part of the URI is as follows:
https://management.azure.com/subscriptions/{subscriptionId}/resourceGroups/{resourceGroupName}/providers/{provider}/{ResourceType}?api-version={version}
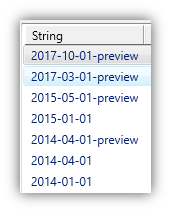
All web APIs have a way of managing different versions of the API in order to add new functionality without breaking existing functionality. Microsoft’s approach was to add the version in the URI. Each resource type has a specific version and there is no “use the latest” option. Typically the API reference will show the latest version and this is what you will use and only change it in the future in order to take advantage of some new functionality or if something is deprecated. We can view the versions available for a specific resource type as follows:
$res = Get-AzureRmResourceProvider -ListAvailable | where {$_.ProviderNamespace -eq ‘Microsoft.SQL’} | Select -expand ResourceTypes
$res | where {$_.ResourceTypeName -eq ‘Servers/Databases’} | Select -expand ApiVersions
Bearer Token
The REST API supports all the normal HTTP methods, GET, POST, PUT, DELETE and PATCH operations based on what CRUD operation you are performing. Also when looking at the API reference pay attention to any Request Header information you need to supply.
One Request Header field which is required in every call (unless the documentation says not required) is the Authorize request header. This is an Access OAuth2 token in the format of a JSON Web Token (JWT) and is obtained from a previous REST API call in order to be used in subsequent calls. I will detail this in another blog.
OAuth2 enables clients to access protected resources by obtaining an access token as “a string representing an access authorization issued to the client”, rather than using the resource owner’s credentials directly. Tokens are issued to clients by a Microsoft authorization server with the approval of the resource owner.
The format of the Authorize value is Bearer {token}. The term Bearer is used to differentiate it from other token types the HTTP specification allows.
In the next blog I will show how we register a client application in Azure in order to request a Bearer Token.
