In Part 4 I showed how to setup the network side in order to connect to the container from the container host and a Hyper-v VM running on the container host.
In this blog I am going to show you how to create a container with more options and then how we can connect to it from outside using sqlcmd and SQL Server Management Studio.
Recreate Our Demo Container
Let’s delete our Demo container and create a new one.
- docker stop demo
- docker container rm Demo
Now we will specify additional parameters for creating our container. I have put the parameters on a separate line for readability
docker create –name Demo
–network Hyper-V-External-Network –hostname demohost
-p 1433:1433 –cpu-count 2 –memory 4g -e sa_password=Password1####
-e ACCEPT_EULA=Y microsoft/mssql-server-windows-developer:1709
docker start Demo
Let’s break this down and explain it further.
- –name Demo – This is the name we use when doing docker commands. Much easier than having to use e6bdda1af906 for example.
- –network Hyper-V-External-Network. This specifies the network we will use.
- –hostname demohost. By default the container hostname is the container ID. This allows us to set a meaningful name.
- –cpu-count 2. Allocates the number of CPUs. Note. Windows does not support the docker update command so we cannot change the value easily.
- –memory 4g. Allocate 4GB of memory. Note. Windows does not support the docker update command so we cannot change the value easily.
- -p 1433:1433. The first parameter is the host port number and the second is the container port number. It is used in scenarios where multiple containers on a single host are accessed externally and we need port isolation on the container host but inside the container, they can use the same port number as another container.
- -e are used to set docker environment variables required by the container. These are defined in the dockerfile used to build the image.
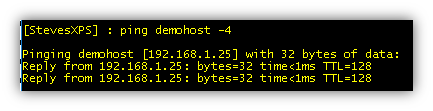
Let’s ping our container.
ping demohost -4
Let’s ping our container from my VM
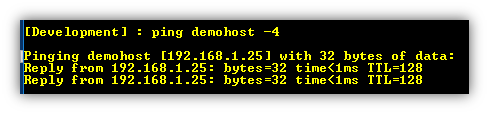
Works great.
The only issue which may be fixed in a later release is that the IP address does not show up when inspecting the container. You will see reference to the command below all across the internet.

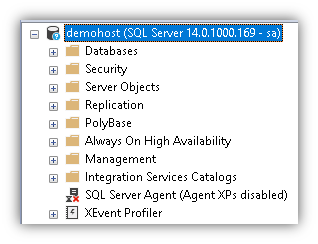
SQL Server Management Studio (SSMS)
Now we have our container setup with a hostname on our host subnet, connecting using SSMS is a no brainer.
We can use the hostname demohost or the IP address. Also since we specified –p1433:1433 when creating the container, we do not need to specify a port number.

The images provided by Microsoft only allow SQL Authentication out of the box. We only have the sa account but we can add more as a post action.
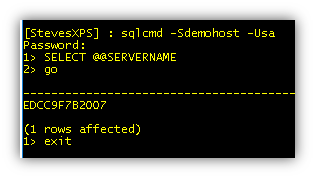
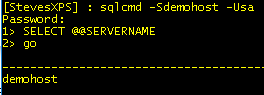
SQLCMD
Same as SSMS, works with the hostname or IP address.
Renaming SQL Server
Notice the SQL Server server name above. This is the name of the container at the time SQL Server was installed and the image generated. Let’s change it to match the demohost name.

docker container restart Demo
Voilà. Notice we have written to our container. I will discuss writing to containers and creating databases in the next blog.
